Tuesday, October 31, 2006

Pie and Plaid


N.B.: An ingredient was omitted from the pie recipe when this post was originally published. The recipe is now correct.

Happy Halloween, readers. Tempted as I am to deplore the devolution of an important pagan holiday into a parade of children in bad costumes begging for candy that their parents will then not allow them to eat, I will forbear, mostly because while I have great theoretical respect for the earth-based religions, my practical knowledge of their workings is extremely limited. (I am, on the other hand, more than happy to indulge in a short rant about language and note that of late I have seen numerous examples of people using "forbear" when they mean "forebear." This practice has, in fact, become so common that the descriptivist vermin who edit dictionaries have started listing "forbear" as an alternate spelling for "forebear." "Forbear" and "forebear" are distinct words with distinct meanings. Please use them accordingly. The same rant applies equally to "forego" and "forgo.")

Anyway. Here in suburban Maryland, it is decidedly autumn, and there is something in the air and something in the light that both presages winter and encourages the notion that the veil between the living and the dead might be thinner than usual. It almost seems possible that one might park one's car beside one of the back roads and follow a buck into the woods and wander into the Samhain celebration of a group that is not quite human. Then, of course, the next morning, you would wander back to your car, only to find it gone because twenty years had passed while you were dancing with the faeries. You would have missed out on a whole lot, of course, but you'd look twenty years younger than all your friends, and, after all, nobody parties like the faeries.

Or you could just make some pie. A. has her own small scale baking business going at school, and she had an order from a teacher for two pies, so we made them last night. Or at least we completed them last night. I made the dough for both pies and partially baked the crust for the chocolate pie the previous night.

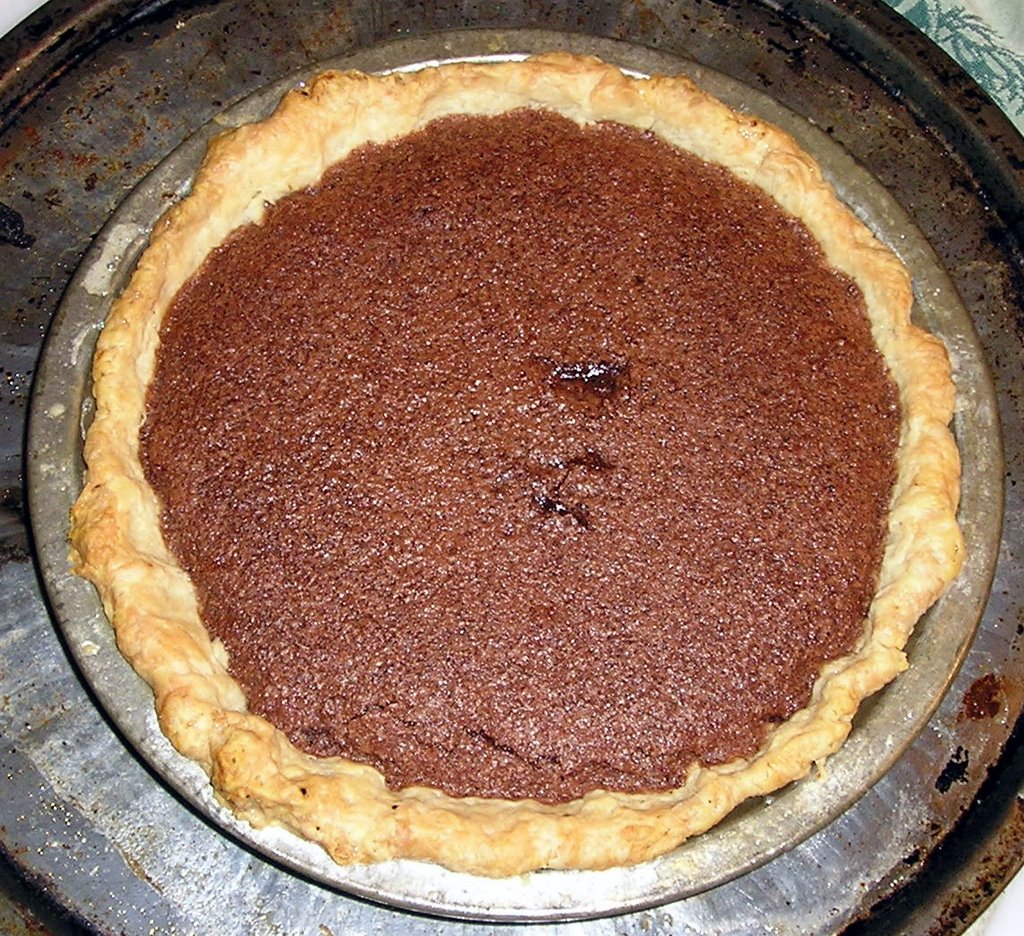
The chocolate pie recipe is my mother's, and I have modified it only very slightly. Technically, this is really a cocoa pie rather than a chocolate pie, and there may be better chocolate pies in the world, but this is the chocolate pie that I grew up with, and I'm very fond of it. Mom always serves it covered with a layer of Coolwhip or Dream Whip, but I don't. Whipped cream would be a happy addition, though. Mom also puts the batter directly in an unbaked pie crust, but it's really better if you partially bake the pie shell first.

This is another recipe that I've requested from my mother so many times that I'd be embarrassed to ask for it again, so when A. told me that she had an order for a chocolate pie, I told her that her grandmother had a good recipe and that she'd have to email her and ask for it. So Mom got some email, A. got her pie, and I got the recipe. It's win, win, win.

Mom's Chocolate Pie

A partially baked 8" or 9" pie crust

1 c. sugar
1/3 c. cocoa powder
2 T. flour
pinch of salt
1/2 c. milk
1 egg
4 T. butter, melted

Preheat oven to 350 degrees.

Combine sugar, cocoa powder, flour and salt in a bowl. Whisk well so that there are no lumps. Beat the egg and milk together, then add to the dry ingredients. Stir well to combine. Add the melted butter and stir again until combined. Pour the mixture into the partially baked pie shell, and bake until set, approximately 35-45 minutes.

Since this is the holiday of odd costumes and begging for candy, behold Plaidwoman. A. was having a very difficult time coming up with a costume, but she eventually decided that she wanted to be, well, an unusual superhero. Inspired by my recent viewing of Project Runway, I very foolishly volunteered to make her costume for her. Let me just take a moment to note that while I did sew for a couple of weeks in sixth grade Home Ec and while I also made a pair of very easy shorts about twenty years ago, I do not sew. I own a sewing machine, but before two weeks ago, I had done nothing with it except loan it to my mother for her Pennsylvania house. She told me it was a pretty good machine. Accordingly, volunteering to make a jacket and a skirt was probably not the smartest move that I could have made. Nonetheless, I'd said I'd do it, so a few weeks ago, we all went to G Street Fabrics and raided the upholstery remnants for six or seven different plaids. I also ordered some patterns from the Internet.

Anyway, A. was thrilled with her Plaidwoman (in case you're wondering, Plaidwoman's super powers are the ability to wear anything with anything and the ability to make others look terrible) outfit, and while it is really not well sewn, it will at least not fall apart. The sewing process was -- when it wasn't frustrating -- almost enjoyable in an odd sort of way, and, really, what else was I going to do with those twenty hours, anyway? I also, in much less time, made a black cloak for L., who is a witch this year. Cloaks are very easy to make, and I only really screwed up on the lining, which doesn't show and which is still nice and warm even with the terrible construction. I got some pretty neat clasps at the fabric store, and L. is overjoyed with her cloak. I think I have pretty much sewn up (deal with it) the title of Best Dad Ever.

This is the apple pie that A. and I made to complete the order. The supermarkets right now are almost literally overflowing with different varieties of apples (including Honeycrisps, so maybe those four hours that I spent driving to and from the orchard last month were not, strictly speaking, necessary), and we got some nice Cortlands for the pie. We used the recipe from Joy of Cooking and a very rich butter pie crust. A. and I worked together on peeling and slicing the apples and on cleaning the kitchen afterwards. So in the course of one evening, I got to pass a recipe down from my mother to my daughter, and my daughter and I got to bake together. It wasn't exactly piercing the veil between the living and the dead, but it was a very good night.

Thursday, October 26, 2006

Caramel Apples


Halloween approaches, and while I am, uncharacteristically, among those who will claim that the holiday lacks much of what made it special when I was a youth, I like to do what I can to make it memorable for the girls and for anyone else with whom I might be celebrating.

As it happens, my office has, for reasons that elude me, decided that tomorrow -- that would be the Friday four days before Halloween -- is a better time to celebrate Halloween than, say, October 31st. Anyway, it is rumored that there is to be intraoffice trick-or-treating tomorrow, so I decided to go a little bit overboard and make candied/caramel* apples for a few lucky ghosts and goblins. Even when I was a child, the days when you could give candied apples to neighborhood trick-or-treaters were rapidly coming to an end; nowadays, giving out food that isn't individually and commercially packaged has become unthinkable, but I reckon that no one at the office is going to suspect me of sneaking in razor blades or rat poison. There are about seventy people in my office, but it's hard for me to imagine that there will be more than a dozen who will actually eat a candied apple, so I'm going to pretend that that's how many I intended to make, even though there were still five apples sitting on my countertop with sticks stuck in them when the caramel ran out. Sixteen apples would probably have been tough to get rid of; as it is, I'll probably have to work hard to get rid of the eleven that I ended up with, but I'm not going to eat them myself, delectable creations though they be. I may, however, take a couple of the plain apples on sticks into the office and eat them to make it look as though I'm indulging. I'm devious that way.

When I gathered my ingredients this evening, I went in search of my candy thermometer, and I found, to my dismay, that it had broken. I considered not making the apples, but in the end I just went ahead without the thermometer. I tried dropping bits of the boiling sugar syrup into ice water, but I think that I started too late, so that what looked like the thread stage was more likely the soft crack stage. I'm pretty sure that I eventually got a hard crack, so I may have been around three hundred degrees, but I can't be sure. Ultimately, I left off worrying about temperature and went by sight and, more importantly, smell. Other candies may be more demanding in terms of exact temperatures, but the caramel for candied* apples is somewhat forgiving, provided that you don't actually cook it to black. It's really easier than it seems. When the caramel is nice and dark and has a delicious caramel smell, then it's ready for the final addition of cream and vanilla. Here are a couple of pictures:


This caramel is not ready:

This caramel is ready:


The traditional handle for a candied apple is a popsicle stick. I couldn't find any popsicle sticks at the supermarket where I got my apples and other supplies, but I did find packs of ten bamboo chopsticks at a very reasonable price. I'm pretty sure that I meant to buy two packs, but I somehow paid for and brought home only one pack, so when I was out of chopsticks, at one per apple, I went with bamboo skewers, at two per apple. Each worked perfectly well, and I find the chopsticks to be very amusing. I doubt that I will ever use anything else, though I'd prefer that they be a couple of inches shorter. Life is full of compromises.

Immediately after I've coated the apple with caramel, I like to roll it in something else. I had intended to use toasted coconut, miniature chocolate chips, and cashew pieces this evening, but my cashew pieces had mysteriously vanished, so I just went with the coconut and chocolate chips. You can use anything, though. (One supposes that you could also use nothing and stop with the caramel, but this is a situation where excess seems especially appropriate.) I've seen people use candy corn, and you could certainly use red hots or jimmies or sprinkles or dragees, if you wanted to be all fancy like. I like the idea of using more than one coating (but not on the same apple: that way lies madness), though since I don't think I've ever made candied apples before, I can't really act like I have any established practices. I may make another batch for the church bazaar, though, because L. has indicated that she would like to make some with me. This despite the fact that she currently has braces and wouldn't be able to eat them. I suppose the apple doesn't fall far from the tree. Ahem.

I used Fuji apples, but any firm eating apple will do. Some day, I would like to try this with Honeycrisps, but that much goodness concentrated in one place is a little bit scary. You want to use a relatively small apple. Amazingly enough, a medium-large or large apple coated with thick caramel and then rolled in chocolate or coconut is more than some people want to eat. What a world.

Note that the recipe below requires a cup of heavy cream in total. Three-fourths of a cup goes in at the beginning, and the last quarter cup goes in at the end. The easiest and safest way to do this is to take a one-cup carton of heavy cream, measure out three-quarters of a cup for the start and add the vanilla extract to the quarter cup that's still in the carton. Then at the end, you can pour the cream and vanilla out of the carton in a thin stream and from a safe height so that if there's a lot of sputtering, you won't get burned.

Candied* Apples

10-12 small to medium, firm eating apples
3/4 c. heavy cream
3/8 c. light corn syrup
3/8 c. dark corn syrup
1/2 c. unsalted butter
1 c. granulated sugar
1/4 c. heavy cream
1 t. vanilla extract

Either line a sheet pan with foil and butter the foil, or put a Silpat on the sheet pan.

Wash and dry the apples. Remove the stems and push whatever you're using as handles into them far enough to hold them securely, but not so far that you push through the bottom of the apple. Set aside.

In a heavy saucepan, combine the 3/4 c. heavy cream, the corn syrups, the butter, and the granulated sugar. Put the lid on, and cook over medium heat until the mixture is bubbling and all of the solids are dissolved. The steam generated should wash the sides of the pan down.

Remove the lid and let boil over medium heat. When the mixture is the color of a good dark caramel and smells like caramel, turn off the heat. From an appropriate distance, pour in the last of the heavy cream and the vanilla extract. Swirl the pan until the caramel is smooth. Put over low heat.

Working quickly, roll the apple in caramel so that all but the very top of it is coated. Hold over the pan and turn the apple, letting the excess caramel fall back into the pan. Roll the apple in whatever coating or coatings you like. Let the apples sit on your prepared sheet pan to harden.


*I would hazard to guess that candied apple purists insist that a candied apple is something that's coated with boiled sugar/corn syrup unadulterated by the addition of cream and vanilla and such. I'm using the terms "candied" and "caramel" interchangeably in this context, even though one is always an adjective, and the other is more properly a noun. I think that a "caramelized apple" would more appropriately be something that's smeared with butter, then rolled in sugar, then subjected to the tender mercies of a blowtorch, but as much fun as that sounds, I lack the necessary equipment. "Caramelized apples," by contrast would probably be what ends up on the top of your Tarte Tatin. In any case, why you would use plain boiled sugar when you could use caramel is a mystery to me.

Wednesday, October 25, 2006

Curried Lentils and Cod Cakes

The finished product.
Before we embark on today's journey of discovery into the little-known lands of fabulous side dishes and the entirely edible proteins they accompany, readers, I must divest myself of an explanation wrapped around a confession perched atop some irrelevant personal information. (People who suggest that I hide sentences containing unpleasant information behind sentences that no human being can parse are misguided, despite all the compelling evidence to the contrary.) After one of my recent periods of infrequent posting, one of my readers commented that he feared I had given up cooking because my doctor had ordered me to lose five hundred pounds. This conjecture, sadly, is untrue only in the particulars. My doctor has, in fact, directed me to lose a significant amount of weight, and, as a result, I have joined Weight Watchers. (I am tempted to say that I really do have to lose 500 lbs. -- even though doing so would violate the laws of physics in a real and impressive way -- just because I so love round numbers.)

While I understand the impulse behind personal diet blogs, I rather detest reading them, so rest assured that you will NOT be seeing entries along the lines of the following:

Tuesday, December 7, 2009. Days on diet: 4,623. Weight: 1,600 lbs. Weight lost today: 0.25 lbs. Cumulative weight lost: 0.50 lbs. Weight to lose: 499.5 lbs. Down another quarter pound today! Really starting to feel like I'm making progress. Tough morning, but at lunch I stopped after the fifth piece of fried chicken! V. tried to get me not to eat the sixth piece of chocolate cake after dinner, but, come on, it's Pearl Harbor Day. Our brave men didn't die in the Pacific for me to skip dessert.


I don't really want to get into a lot of detail about the diet, but I'll summarize a few points here so I'm not tempted to mention them later. Weight Watchers (hereinafter "WW") is a good plan for me because it's a sensible food plan, and there's excellent peer support. And let's just pretend that I said that last phrase without irony, and that "peer support" doesn't mean wading hip deep into a swamp of estrogen at WW meetings. Seriously, the people at a WW meeting are very nice, but what you really get from going there is one part feeling like you're on a (not necessarily safe) National Geographic expedition and two parts an intense desire to lose weight so that you can go hang out with men again.

Anyway. WW gives you a choice of two plans. One plan involves keeping careful track of everything you eat. As if. The other plan gives you a list of safe foods, allows you to eat as much of these safe foods as you wants, and allows you to eat a much smaller amount of foods that are not on the safe list. When I heard these options, I immediately knew that I wanted the second plan. For years, I've watched in envy on cooking competitions where the contestants were given a basket of ingredients and told to make a meal from those ingredients. The WW core plan is almost exactly the same thing. It's the perfect plan for the serious cook who wants to lose 500 (or whatever) pounds.

The real culinary benefit to being on a diet, however, is that I now have a good reason to prepare my own meals. For the last nearly three years, V. has, as a matter of course, prepared dinner. This situation has been terrifically convenient for me, but it does rather limit the amount of time that I spend cooking. And because I cannot bear to eat the same thing over and over for dinner (lunch is an entirely different matter, and so is snacking: it would appear that my tolerance and appetite for grilled pineapple are limitless), I'm forced to innovate.

Anyway, enough of that. This past weekend, I was in DC with a group of friends to catch one of the movies at the local gay film festival. The film was at nine, so we naturally met at 6:30 to argue about where we were going to eat. We ended up at Local Sixteen, on U Street, a few blocks from the theater. I hadn't brought much of a lunch that day, so I was very hungry by the time we finished deciding where to eat; walking to the restaurant; explaining to the host that while we were presently four, we would likely be six or seven by the time we were done; finding a suitable table; and arranging ourselves at the table so that one of the late arrivals would be forced to sit at the opposite end of the table from his new boyfriend whom we hadn't yet met. Local Sixteen is, it turns out, an okay place to eat, and it was certainly a big improvement over where we'd eaten before the movie a year ago. It's a sort of mixed American restaurant without a particularly opinionated menu, and it is moderately priced. As I was especially hungry, I decided to start with the asparagus soup and then finish with the king salmon with curried lentils. The soup was too acidic by about half, but I was pretty hungry, so it was okay. The salmon was acceptable but neither remarkably fresh nor remarkably well prepared.

But the curried lentils were divine. I was relatively certain that I tasted coconut milk, and a variety of spices, but I wanted to know more, so I asked the waiter to find out what he could for me. He reported back that they had curry and coconut milk. Well, at least he didn't lie, and I suppose that a printed recipe was rather too much to hope for.


The <i>mise en place</i>.
Curried Lentils

2 t. olive oil
3.5 c. water
1/4 c. finely diced onions
1/4 t. ground turmeric
1/2 t. ground cumin
1/2 t. red pepper flakes
1/2 t. fennel seeds
1/2 t. coriander seeds
1/2 t. kosher salt
1 T. chopped cilantro
2 cups dried lentils
1/2 c. coconut milk
Additional salt and pepper to taste

Put a heavy saucepan over medium-low heat. Add the olive oil. Put the water in a large glass bowl or measure, and microwave it to a simmer. Add the onions to the olive oil, stir, cover, and cook for three minutes.

Add the spices, salt, and cilantro to the pan and stir for a minute. Add the lentils and stir to coat lightly with the oil and spices. Add the coconut milk and stir for another minute.

Add about 2.5 cups of the hot water and stir. Bring the pan to the boil, then reduce to a simmer, and cover. Simmer until the lentils are tender, about thirty-five or forty minutes, stirring every ten minutes or so, and adding more water as necessary. Correct seasoning.


I'll be the first to admit that these lentils are not quite as good as the ones I had at Local Sixteen. But they are very good indeed, in spite of my having pulled the spice mixture out of thin air. I have never understood curries as well as I might if I, you know, did a little research, but my mixture worked pretty well. I reckon that a bit of fenugreek is also called for, but I somehow didn't have any. The red pepper flakes and the coconut milk balanced each other very well. If you wanted to make this dish even better, you could add more coconut milk. A can of coconut milk is fourteen ounces, so you could use half a can instead of half a cup, and you'd have something silkier and even more delicious. You might have to add a bit more spice, but you might not.

Don't be afraid of using the whole spices here. You could certainly grind them if you felt like it, but even without grinding, they somehow manage to disappear during the cooking so that you're only eating lentils; you won't bite into a whole fennel or coriander seed.

My fish cakes, alas, were not as wonderful as the curried lentils. They were still good, but they were a tiny bit dry, and the flavor profile was not quite what I wanted, largely because I didn't have any horseradish on hand. I had not thought that it was physically possible for me to be out of horseradish without the universe imploding, but recent evidence suggests otherwise. Or maybe the horseradish is hiding, I don't know which. In any case, I'm going to record the recipe as I made it, just so I'll know, but if you decide to try this, I beg you to swap out the mustard for horseradish, to use two limes, and to add a tablespoon of toasted (but not too dark) sesame oil. That's what I'm going to do the next time. I will probably also try with another fish next time, which will necessitate a name change. The cakes are fine with Cod, but I'm going to use whatever similar fish comes in a big bag in the freezer this week at Costco.

Cod Cakes

1.5 lbs cod fillets
4 cups water
1/2 onion
1/4 t. turmeric
1/4 t. celery seed
1/2 t. peppercorns
1 t. salt
1 pod green cardamom, crushed

1 potato, about 10 ounces
1 T. diced onion
cilantro
1 lime
1 t. mustard
2 eggs
1/2 t. salt
Ground pepper, to taste.

If your cod fillets are frozen, defrost them.

In a heavy saucepan or skillet, combine the water, onion, turmeric, celery seed, peppercorns, and salt. Bring to a boil, cover, and simmer for about five minutes. Add the cod fillets, bring the water back to the simmer, cover, and simmer for about eight minutes. Turn off the heat and let cool. Pull out the cod and refrigerate it. Strain the poaching liquid and reserve for another use.

Bake the potato in either the microwave or in a conventional oven. Let it cool enough to handle. Cut it in half and scoop out the inside with a spoon. Leave the flesh in a bowl to cool. Put the potato skin into the food processor along with the onion, cilantro, and the juice of the lime, and pulse until finely chopped. Break the cod into pieces and add it to the food processor along with the mustard, salt, and pepper. Pulse until somewhat mixed, then add the eggs and pulse again until thoroughly mixed.

Mash the potatoes, then add them to the food processor, and pulse until the potatoes are incorporated.

Put a nonstick skillet over medium heat. Add a spritz of olive oil. Rinse your hands in cold water, and form the fish mixture into twelve patties. Put as many of them as will fill comfortably in the skillet. Fry 3.5 minutes on each side. Spritz with additional olive oil between batches.

Tuesday, October 17, 2006

Project Cocktail

Repeat after me: I will not pollute my martini with cheap ingredients.
Project Runway is almost over. Naturally, this reminds me of high school.

Do you remember graduating from high school? On the one hand, you were sad to be leaving your friends and a familiar environment that you had finally more or less mastered, but the other hand was busy flagging a cab to take you on to the rest of your life? And then you got your diploma and went to a graduation party or six and maybe took a week of vacation at the beach, and suddenly you realized, "Is that all there is?" College was still three months away, and you had to survive your pathetic summer job, and what had seemed bright and shiny and imminent was distant and scary and beyond vast hills of still-living-at-home-with-mom-and-dad-and-your-annoying-younger-
siblings-who-didn't-understand-that-you're-all-grown-up-now-dammit.

Of course: you get older, you get wiser. So while the hard-upon-us final episode of Project Runway might seem like those last carefree, post-final exam days of high school, you already realize that all you have to look forward to afterwards is Top Chef, and, well, eh.

So enjoy the final episode while you still can, readers. And how better to celebrate Season 3 than by raising a glass to your favorite designer or designers? And if, by chance, you're wondering what ought to be in that glass, I'm here to tell you. It should, by now, be obvious that we're dealing with four very talented designers with very different points of view. Accordingly, I'm offering you four drinks, one for each designer. As with the hors d'oeuvres in the last post, it should be painfully obvious which drink is for which designer, even before my entirely heavy-handed hints. Three of the following drinks are alcoholic, but I have done my best to give virgin alternatives.

The New York Times.  The Bad Mommy.  The Good Mommy.I will confess right up front that I have not always been a big fan of the martini. In fact, when I was about twenty-one, some friends and I went to the Hilltop Steakhouse (a temple erected for the worship of meat, north of Boston), and I ordered my very first martini. Whoa. The Hilltop is not exactly a study in refinement, and its martini was entirely in keeping with the rest of its menu and with the huge plaster cow standing in front of the restaurant. God only knows what they put in that martini, but I was a tiny bit apprehensive about trying another one. Still, I finally did have my second martini. Earlier this evening. What a difference twenty years and good gin make. I may henceforth become a semi-regular martini drinker, but I will probably insist upon making them myself.

If you study the martini literature, which is about as extensive as you might expect for a drink that was much loved by Dorothy Parker, you will find a great deal of disagreement about three fundamental questions. How dry should the martini be? Should it be shaken or stirred? Should it be served with an olive or a twist. I could (and probably still will) go on at some length about each of these questions, but here are the short answers: bone; neither; both.

If you're fabulously glamorous, a martini is basically an excuse to drink cold gin. The degree of dryness of a martini is determined by the amount of vermouth it contains. The less vermouth, the dryer the martini. As a two-time consumer of martinis (and, more importantly, as a complete know-it-all when it comes to all matters ingestible), I can say with absolute authority that without vermouth, you don't really have a martini, but with vermouth, you don't really have the best martini. Fortunately, you can have it both ways.

It is well known that shaking your martini bruises the gin. What's less well known is that stirring it merely bruises the gin to a lesser extent. And the sixteen-ton elephant that no one wants to acknowledge is that in either case, exposing your gin to ice cubes dilutes the gin and exposes it to water that may be less than perfect. To get the very best martini, you need to make your gin ice cold, but you need to avoid ice. Fortunately, you can have it both ways.

No other martini-related argument is even half as vicious as the twist-or-olive debate. To give just one example, my mother and my Uncle Gilbert did not speak to each other between December 31, 1972, when he gave her a martini made with a twist, and December 25, 1978, when he sent her a jar of olives as a peace offering. I am not making this up.* The real tragedy here is not that we had to avoid my Uncle Gilbert (who, truth be told, was not all that fun to be around) for six years. The real tragedy is that in this great land of plenty, we still have people focusing on "or" when they should be focusing on "and." Both the olive and the lemon have something to offer the martini. Fortunately, you can have it both ways.

At no time during the preparation of the following drink are you to so much as consider the possibility that you could get away with inferior ingredients.

The Bad Mommy

Olives
A lemon
Lillet
Tanqueray
One or more martini glasses
One or more toothpicks

At least two hours, or as much as several months, before you're going to finish the martini, open the jar of olives and drain off the liquid. With a vegetable peeler, remove the zest -- but not the pith -- of the lemon in strips. Push the strips down into the jar of olives. Fill the jar of olives with the Lillet, recap the jar, and put it in the refrigerator. Put the Tanqueray in the freezer.

Just before you want to serve the martinis, take one toothpick per imbiber and spear three olives per toothpick. Put the toothpicks in the martini glasses. Pour the Tanqueray into the glasses. Serve.

If you follow this method, you will have a perfectly dry martini with extremely cold yet thoroughly unbruised gin. You will also have a hint of vermouth and olives with a bit of a twist. You will want to sip this drink very slowly, both to savor the intricacies of the flavor and because it's totally deadly.

And the non-alcoholic alternative:

The Good Mommy

A martini glasses
4 ounces of moral superiority

Serve at room temperature. Enjoy!

This next drink will not appeal to everyone. Some will find it obnoxious, but those who love it will do so passionately. It is simultaneously brash and excellent. You might, in fact, not believe that a drink could be this good without some professional help. But it is what it is, without apologies. And it has no alcohol, so you can serve it to your friends who've been through rehab.

The Firecracker

Per serving:

3 T. firecracker syrup (recipe follows)
3 T. fresh lime juice
Ice cubes
Club soda

In the bottom of a tall glass, combine the firecracker syrup and the fresh lime juice. Add ice cubes, and fill with club soda. Drop a slice of hot red pepper into the drink, and garnish the glass with a slice of lime. Serve with a bendy straw.

Firecracker syrup

One cup water
One cup sugar
Two hot, red cherry peppers

In a four-cup glass measure, combine the water and sugar. Stir. Cut a cross in the bottom of each pepper, as though you were going to quarter it, but without cutting all the way through, so that the stem is left intact. Put the peppers in with the water and sugar. Cover with plastic wrap, and microwave on high until the water is boiling and the sugar is dissolved. (You may have to stir the syrup once or twice.) Let the syrup come to room temperature, then strain and refrigerate.

You may note that there are no bubbles in drink in the picture. I forgot to buy club soda, so I used still water. If I were a food stylist (and I'm obviously not), I would have cheated and used the bottle of tonic water in the frig to make it look like I'd used club soda. But then I wouldn't have been able to drink my firecracker, and I really wanted to drink it because it's a seriously delicious drink, though I think it would be even more seriously delicious with club soda. To my taste, the spice, the sugar, and the lime compliment each other perfectly, but if you don't like any sort of hot pepper, then just skip this drink.

You could easily make the firecracker alcoholic by adding an ounce of vodka. I don't see the point, but I know plenty of people who would.

What would a Project Runway viewing be without a tropical drink? Dull, that's what. This drink started out as a version of a mai tai, but it shook off the oppressive politics of the land of its birth and went on to make its own way in a new land. It goes down very easily, so be careful, or you'll be vasted before you know it, because it's a lot more potent than it seems at first swallow. Ideally, you'd have some mugs shaped like pineapples or some coconut shells to serve this in, and if you do that, you can call it a Miami Vice. Serve it in a glass, and the appearance dictates the name.

Miami Iced Tea

6 ounces pineapple juice
6 ounces cranberry juice cocktail
6 ounces dark rum
3 ounces triple sec
3 ounces amaretto
3 ounces lime juice
Ice

Mix the liquid ingredients in a one-quart pitcher. Add ice until the pitcher is full. Serve in tall glasses, over more ice, and garnished with lemon wedges. Enjoy responsibly.

This last drink is a little bit harder to characterize. Properly made, it could also be served as a dessert at your next dinner party because this is a flexible drink. This is a drink that thinks about the task at hand and makes it work. It's hot and it's cool. It's dark and it's light. It's sweet, but it's substantive and complex, and it's got a couple of secrets. It's the perfect drink for an autumn (K)night.

The Hotlanta

Coffee (cold)
Sweetened condensed milk
Bittersweet chocolate
Dark rum
Coffee (hot)

Put the cold coffee into either an ice cube tray or into individual containers and freeze solid.

In the bottom of an oversized coffee mug, pour a layer of sweetened condensed milk (about two tablespoons). Add one or two tablespoons of dark rum. Grate bittersweet chocolate to taste on top. Fill the cup about halfway with coffee ice cubes. Add the hot coffee. Serve with a spoon.

I was a little short on time, so my chunk of ice was not fully frozen when I completed this drink, so I can't really show you the desired result. It still tasted very good, but you will want to take your time and use fully frozen coffee ice. As the ice melts, stir up the sweetened condensed milk from the bottom. It should be a lot like coffee ice cream.

If you want a nonalcoholic version, just leave out the rum, and your coffee will be perfectly fine. Alternatively, leave in the rum and add a similar amount of Frangelico. I didn't, but only because I somehow ran out. I think the producers drank it when I wasn't looking.

*Please don't ever believe me when I say that. I am totally making this up. My mother doesn't even drink gin.

Thursday, October 05, 2006

Project Hors d'Oeuvres

I'm sure that some or most of my readers do not share my obsession with Bravo's Project Runway. This is not really one of those situations where it makes sense to smile pityingly and say, "Oh well, more for me!" but I will say that it's the one reality TV show that I can watch with no guilt whatsoever, even without having to resort to the excuse that I watch it with my daughter, so it counts as quality family time. (I won't name the shows that I watch with huge quantities of guilt: find your own train wrecks to gawk at.) A couple of weeks ago, when I thought that the episode that I thought would narrow the field down to three designers was going to air, I set out to make four nibbles to enjoy while shouting at the judges (on TV, where they could not have heard me even if the show had not been taped months prior, you understand) that if they dared to send Laura home, I would have their entrails. (I've never made sausage, but, well, it's best that we leave that thought unfinished.)

I left the post unfinished for a while, but, as luck would have it, even after the final elimination episode, there are still a final four, so if you want to make one or more of these appetizers for one or both of the final two episodes, they're still à propos.

Each of the following recipes is meant to represent one of the remaining designers. Fans of PR will have no trouble determining which corresponds to whom, and non-fans will not care, but just to be a little more obvious, I'll say that the recipes include

- a goat cheese and tapenade toast that is chic and very well constructed, executed in a very limited color palette: the gays love it;
- a cheese log that slices to reveal a wild print: this one would be especially good in Mi-am-eee;
- an edgy meatball (oh shut up) that combines ingredients that can't possibly belong together but that still manages to taste great even though you might prefer that it didn't; and
- a simple but well-thought-out yogurt dip with clean and sweet flavors: it's sure to be a fan favorite.

(And let's all just take a moment to be grateful that I wasn't forced to come up with an appetizeral representation for Vincent, shall we? There may be cultures where Prozac-encrusted hyena hunks are considered the height of taste, but the idea really doesn't turn me on.)


Fabulously Glamorous Tapenade Toasts

2 T. olive oil
2 small cloves garlic
Thinly sliced white or wheat bread (I used Pepperidge Farm thinly sliced wheat)
5 ounces goat cheese at room temperature
2 ounces cream cheese at room temperature
1 10-ounce jar of pitted black calamata olives, preferably packed in red wine vinegar
Salt
Pepper
Parsley or cilantro, optional

Preheat oven to 325 degrees.

Put the olive oil in a heavy saucepan or small skillet and set over low heat. Cut one of the garlic cloves in half and put it in the oil. Don't let the garlic burn.

Trim the crusts off of the bread so that the remaining bread is crustless and square. Cut the squares on the diagonal twice to leave four small triangles. Put the triangles on a baking sheet and set in the oven for 8-10 minutes, or until lightly toasted. Remove the triangles from the oven, and brush one side of each of them lightly with the garlic-infused oil. Return them to the oven for another 8-10 minutes, or until they're well toasted. Then let them sit until cool.

Remove the garlic clove from the oil. Remove the pan from the heat. Drain the olives, reserving some of the liquid they were packed in. Add the olives to the saucepan or skillet. Mince or puree the second clove of garlic, and add it to the olives along with a generous grinding of pepper and a pinch of salt. If you are using the parsley or cilantro, chop a tablespoon or so of it and add it.

Either turn the mixture into the bowl of your food processor or use your immersion blender to puree it in the pan. Either way, add enough of the reserved liquid to give you something that will spread easily but not run. Taste and correct seasoning.

Cream together the goat cheese and cream cheese. Spread a thin layer of the cheese mixture on each triangle and then top with a small dollop of the tapenade.

Hot Mess Meatballs

10 ounces small portobello mushrooms
1 T. butter
1 cup red wine
16 ounces bulk sausage
1.5 cups fresh bread crumbs
1/2 cup crushed pineapple, drained
1 t. dijon mustard
1/4 t. Tabasco
1 egg
salt
pepper
1 can beef broth
2 T. butter, softened
2 T. flour

Preheat oven to 350 degrees.

Slice the portobello mushrooms. Take about a cup of the sliced mushrooms and saute them over high heat with the butter. When they are nicely cooked and browned, reduce the heat slightly, add half the red wine to the pan, and stir well to deglaze. Pour the mushrooms and (mostly evaporated) wine into the food processor and chop fine.

In a bowl, combine the chopped, cooked mushrooms, the sausage, the bread crumbs, the pineapple, the mustard, the Tabasco, the egg, and salt and pepper to taste. Mush this all together very well with your hands, then form into balls of the size you like (mine were larger than they should have been), and place on a baking sheet. Bake for 20-25 minutes, or until they're nicely browned and done. Remove from the oven and let cool a little.

In a saucepan, combine the beef broth, the remaining half-cup of red wine, and the remaining mushroom slices. Bring to the boil and simmer for five minutes. Use your immersion blender to puree the mixture (I omitted this step when I made the batch that I photographed above, alas). Knead the butter and flour together into a beurre manié (aka "kneaded butter"). Bring the sauce back to the boil, whisk in the beurre manié, and cook until the sauce is thickened. Taste and correct the seasoning.


Hippy Dippy Cheese Log

10 ounces cheddar cheese
2 T. butter
2 T. red wine
2 T. white wine
1 T. finely chopped chives
1 T. capers
3 T. pistachios
1/4 c. Pine nuts, toasted

Coaresly chop or grate the cheddar and put it into the food processor along with the butter. Pulse until the two are well combined and relatively smooth. Divide the mixture into two parts. Add the red wine to one part and the white wine to the other, and mix until smooth and spreadable. Stir the chopped chives into the white mixture.

Cover a cutting board with a sheet of plastic wrap. Spread the white mixture into a rectangle about nine inches long and six inches wide. Spread the capers and pistachios evenly over the white mixture and press them lightly into the surface. Spread the red mixture over the white mixture. Use the plastic wrap to roll the log as tightly as you can.

Twist the ends of the plastic wrap and refrigerate until the log is fairly solid. Roll the log in the toasted pine nuts. Serve thinly sliced on crackers, and just below room temperature.

Save-a-Ho Yogurt Dip

1 cup Greek style yogurt
1 lemon
3 T. toasted walnuts, coarsely chopped
3 T. honey
Fresh fruit

Line a strainer with cheesecloth or a paper towel and put the yogurt inside. Put the strainer over a bowl and refrigerate for two hours or overnight.

Finely grate the zest of the lemon, then squeeze the juice out of it. Strain the juice. Combine the drained yogurt, lemon zest, lemon juice, walnuts, and honey. Stir well. Add more honey or lemon juice if you think it wise.

Serve the dip in a bowl, accompanied by sliced fresh fruit. I used figs because we have a fig tree in the back yard, and it's currently got ripe figs on it, and they're great, but sliced pears or apples would also work splendidly.