Sunday, November 26, 2006

The Season Begins


Before I discuss the above picture (which, for those of you who haven't guessed, is a big part of the answer to "What happened to this weekend, anyway?"), I'm going to go ahead and give you the unrelated recipe that I was going to throw at the end of this post. I made a number of changes in this year's Thanksgiving menu, and the dinner was an unqualified success. One thing I changed only slightly was my cranberry sauce.

Cranberry Sauce

1 cup sugar
1 cup water
2 cups fresh cranberries
6 kumquats, sliced very thin
1 t. grated ginger

Combine the sugar and water in a saucepan, cover, and set over medium heat. When the sugar dissolves and the water is boiling, stir in the cranberries. Simmer for five to ten minutes. Remove from heat, add the sliced kumquats and grated ginger. Let cool, then refrigerate.


The amount of time that you simmer the cranberries determines how thick your sauce is. If you want to be able to mold your sauce, then cook it until it's thick enough. You can test this by putting a saucer in the freezer and putting a few drops of the cooked cranberries on it and seeing how firmly it sets up. I normally prefer a saucier texture, but this year I went for something in between. The final product was not quite firm enough to hold its shape in a mold, but you couldn't really pour it either. It was very easy to spread on a piece of turkey.

I did use Whey Low in place of granulated sugar for this recipe. It didn't appear to affect the flavor, but while granulated sugar will usually dissolve by itself in water over a medium flame, I needed to stir the Whey Low and water a little bit to encourage it to dissolve.

You will find grating your ginger to be immensely easier if you store your ginger root in the freezer. Bear in mind that if you freeze it and use a microplane grater, one teaspoon of the grated ginger will weigh much less than a teaspoon of room temperature ginger grated by any other method, so you may want to add more.


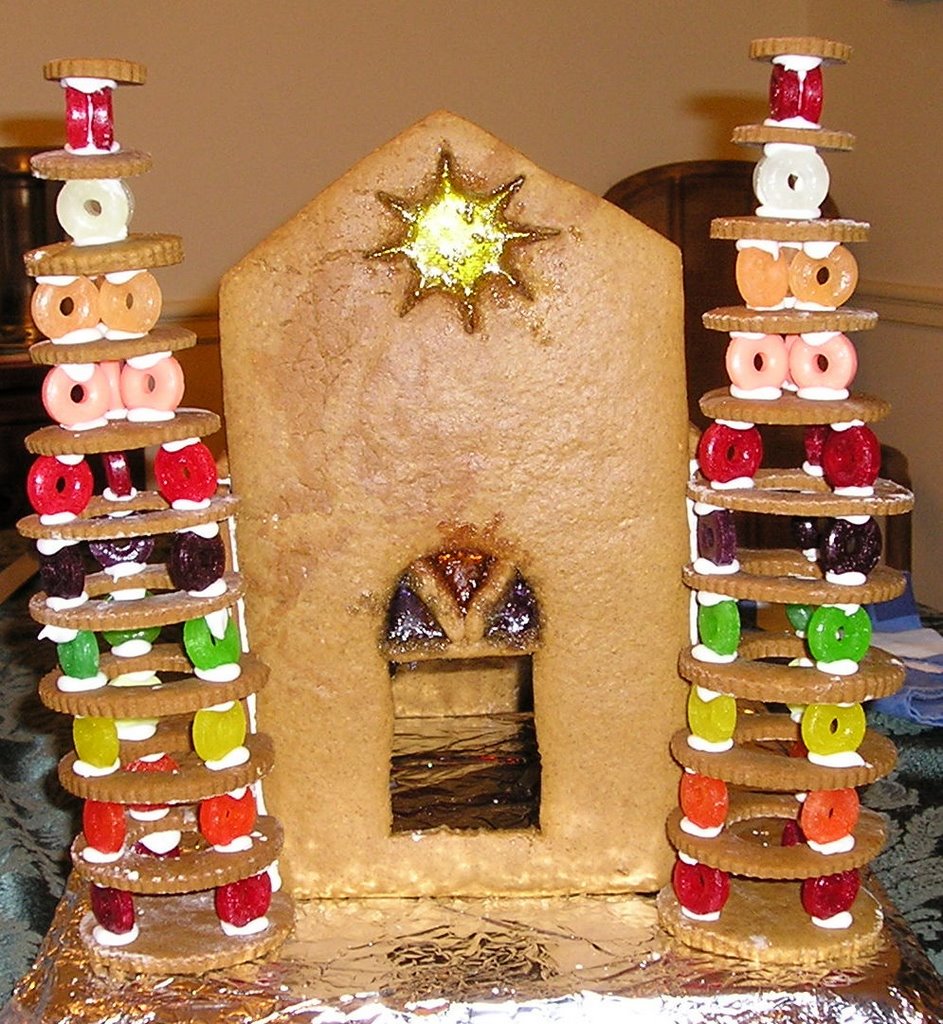
My experience leads me to believe that if you are not the sort of baker who can enjoy the process even if the end result is not perfect, then you had probably best stay away from the making of gingerbread houses. Because, let's face it, the gingerbread house I made this weekend is really not up to code. It is, nonetheless, fabulous, and I get all kinds of pleasure from seeing it on the table. Gingerbread construction is also not for the high strung: if you make a gingerbread building, things are going to go wrong, and you're going to have to be able to adapt quickly. And you must never, ever panic. Gingerbread houses have no mortgages and very high deductibles. The worst that can happen is that you end up with a lot of oddly shaped cookies.

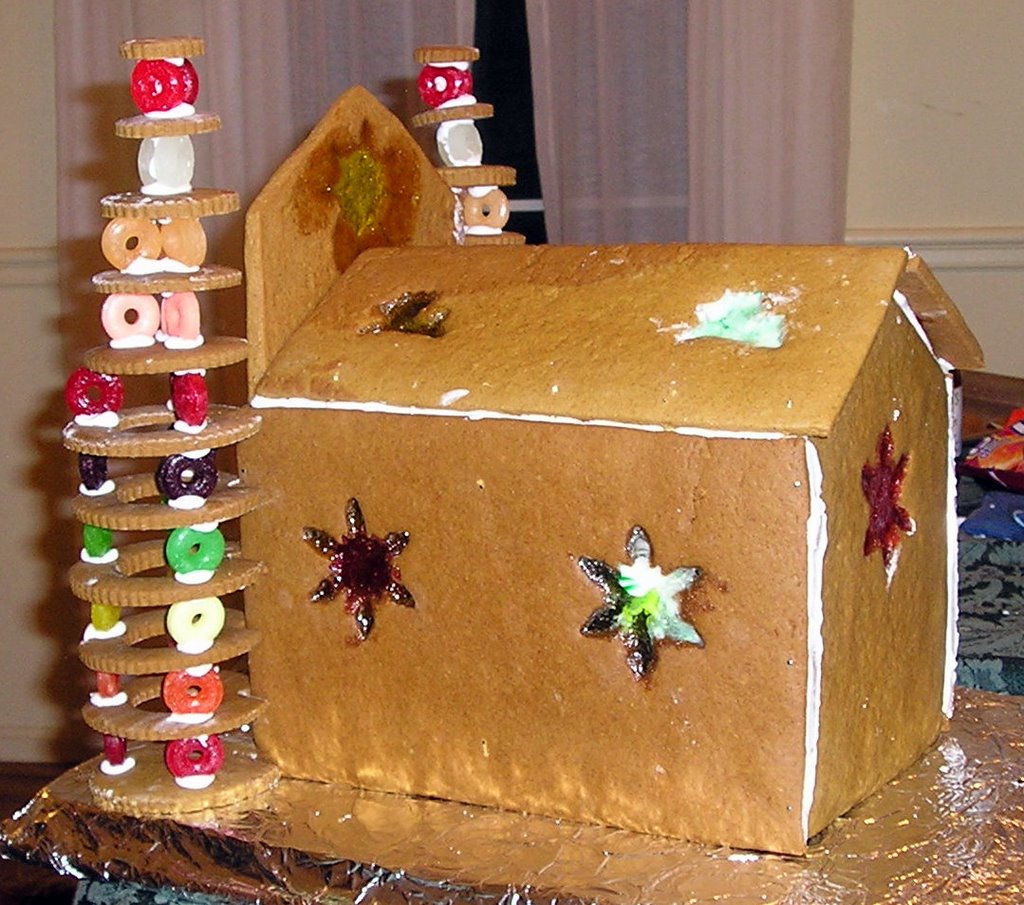
Leaving aside the spires, which are currently free standing though I will likely affix them to the body of the temple if they do not collapse in the next week or so, there are only seven pieces to the main structure, and in the interests of not forgetting what they are and of helping anyone else who's looking for a slightly different design, I'll tell you that the two side walls are 6-inch by 9-inch rectangles. The front of the building is six inches wide. It is ten inches tall on either side and twelve inches tall in the center. After I made the front, I cut four inches off the base of the template to make the rear of the building as well as the interior arch, which you cannot see.

When you're making a gingerbread house, there are two basic ways to go. You can make large slabs of gingerbread and cut your pieces from the baked slabs. Or, you can cut your pieces from the rolled dough and then even them up (or not) once they're out of the oven. The major advantage of the first method is that you end up with pieces that are exactly the size of your templates and that are somewhat easier to work with, especially if you make the gingerbread thick enough (if, say, the dough is 1/2" thick before baking) to miter your edges. The disadvantage is that you waste a lot more cooked gingerbread. This is not so much of a problem if you use a good recipe and have hungry helpers about. For me, the main advantage of the second method is that it makes the stained glass work easier, but there's no doubt that it makes the actual erection of the gingerbread building tougher. One of my side pieces cracked while I was picking it up to put in place. I should probably have rolled my dough thicker and/or cooked it for longer. As it was, I merely accepted L.'s contention that it looked more like an old house with a crack in one of the walls.

Anyway, I'm not going to give you the recipe I used to make the gingerbread because the piece that was left over that I tasted was pretty bland. This is likely not the fault of the recipe itself. I believe that ground ginger is somewhat volatile, and I've had the same giant (16-ounce) container of it for years because the only time I use ground ginger is in holiday baking. It still smells like ginger (or it did before I threw it away this afternoon), but I put in three times as much as the recipe called for, and I could hardly taste it. I am used to tripling the amount of spices in spice cookie and gingerbread recipes, (It's my belief that many of these recipes have been handed down for many generations and originated in times when spices were prohibitively expensive and when a cookie with any ginger or cloves at all would have been a delicacy.) but when I do so, I normally get a strong and delicious flavor.

I will tell you that I rolled out my dough to something like 3/8" thick, put the template down on the dough, trimmed the dough roughly, transferred the rough-cut piece to my Silpat-covered baking sheet, and trimmed the dough carefully with a pizza cutter. After cutting, I put the baking sheet in the refrigerator for a few minutes then took it out before using cookie cutters to make the cutouts. Then I mounded crushed pieces of candy (and let me tell you, if you're in the kitchen pounding individually wrapped hard candies with a hammer, your children will fight to be the one who gets to help you) in the cutouts and baked the whole shebang at 325 for about fifteen minutes. If you follow this method, let the pieces cool most of the way to room temperature before attempting to remove them from the Silpat. The whole structure is held together with icing and straight pins.

I used fluted circular cookie cutters in a variety of diameters to make the spires. Most of the levels in the spires were cut once with a wider cutter and then a second time with a smaller cutter to produce a donut shape. I originally did this with the intent of putting a light source at the base of the spires and letting it shine out, but I'm not sure that I'll be able to pull that off. I also made a small right-angle cutout of the outside of the donut so that I could push the spires up against the building, the corners of which were meant to fit in the right-angle cutout. The right angles were difficult to cut correctly, which is a big part of why the spires lean away from the building, though I prefer to think of it as incompatible architectural elements recoiling from each other in horror.

The structure is meant to be reminiscent of a cathedral, but I decorated it principally with pagan imagery, so it's really a gingerbread sun temple. The spires, however, have a heavier Catholic influence. You can tell because the first few levels of the spires are supported by lifesavers in colors that mimic the rainbow: after all, is there anything gayer than the Catholic church?

I still have most of the construction icing left in a ziplock bag in the refrigerator, so there's a good chance that I'll be attaching more stuff to the temple at some point during the holiday season. It is easy to get carried away with decoration, but that's really part of the fun.

Tuesday, November 21, 2006

Longsuffering Green Beans


Vegetables, like youth, are wasted on the young. Which is not to say that you shouldn't encourage children to eat vegetables: I believe there's been some recent research linking early vegetable consumption with some outcome or other that's widely recognized as good. I know this because V. mentioned it to me when he was (yet again) lamenting my lack of parenting skills and the resultant low level of vegetable consumption by my offspring. My response (yet again) was twofold: a) if the kids get good grades and they're never in trouble and people go out of their way at church to hunt me down and tell me what wonderful children I have, then I can probably overlook the fact that L. will typically eat no more than one broccoli floret or three green beans at dinner; and b) dude, more for me.

When I was a lad, not eating my vegetables was not an option. My mother's typical reaction to vegetable-induced consumption reticence was to threaten additional helpings. Mom, ever one to extrapolate the universe from a single data point, always assumed that if the vegetables tasted good to her, they obviously tasted good to us, and that our unwillingness to eat them was nothing more than an attempt to annoy her. Or perhaps evidence of demonic possession: there can be no other explanation for threatening a child with a dose of cod liver oil.

Fortunately, the only long-term effect that I suffered as a result of my parents' dinner policies1 was that I didn't learn to appreciate spinach until I was an adult and was finally given to understand that spinach is a leafy green and not something that comes only as a frozen rectangular solid. I also didn't learn to like (or in some cases tolerate) most forms of squash until I was an adult, but since eating squash as a child mostly meant suppressing my gag reflex, I don't think that had anything to do with how it was prepared. I am also not fully convinced that my life has been enriched by my increased appreciation for squash, though I suppose that I would miss zucchini if it were to disappear suddenly.

But while most vegetables evoked something between indifference (broccoli) and terror (brussels sprouts), I have always loved green beans. I suppose that if you had asked me about them when I was young enough, I might not have identified them as a vegetable at all. They would simply have been green beans. And, aside from iced tea -- without which our table never was -- green beans were probably served more often than any other single food. It is likely that several hundred times during my childhood I was sent down into the basement2 to fetch a quart of green beans.

My father, I believe, always felt somewhat limited by the one-acre lot that we lived on because it only provided him with enough room to have a garden about eighty percent as big as a tennis court. He came from a Mennonite family, though, so not owning and working a real farm struck him as selling out, somehow. For most of my youth, the garden included four double-rows of string beans. In the mid-spring, Dad would get out the rototiller (I sometimes did this when I got older) and work the soil, which had already been turned under by a local farmer doing us a favor, discarding the larger rocks as he went. Then we'd get out with the rakes and even out the soil, then he and I would head off to the local seed store where we'd get a small paper bag full of been seeds coated with something pink which I suppose must have been an insecticide. (Dad subscribed to Organic Gardening, but he took it with a grain of Miracle Gro.) Then we'd go home, and dad would mark the rows by driving two stakes, connected by a thick string, into the soil at the sides of the garden. He'd move down the row, poking the rake handle into the tilled soil, and we'd follow behind, dropping the seeds into the holes and covering them up.

As you might guess, this is all a lot more fun to think about now than it was to do when I was a teenager. The planting of seeds really wasn't bad, but that would soon be followed by weeding. Lots and lots and lots of weeding. And then, eventually, picking, which involved going down all four double rows bent over, holding a large colander, and whinging.

Even as a teenager, I never particularly minded snapping the beans. When it was time for canning, a group of us sat on the back porch and worked together. You'd pick up a bean, snap off the stem and the tail end, snap the bean in half, and put the two halve your bowl. Then they'd go upstairs to the kitchen to be washed in a big sink full of water. At the end of the session, someone would take a broom and sweep all of the bean tips and tails off into the back yard.

The actually cooking and canning (i.e., putting into jars and processing) was not something I often witnessed. My mother liked to do this by herself, perhaps so that she could complain more about it later, but perhaps simply because it was work that couldn't be trusted to anyone else. Before she could actually can, she had to send my father up into the attic to retrieve the very large (it could process seven quart jars at a time) and heavy pressure cooker, and she had to prepare however many jars and lids she'd be using for that session. Given that she would typically put up just under a hundred quarts of beans in a summer -- mostly over a period lasting about two weeks -- she probably had ample reason both to complain and to not want anyone around who didn't know exactly what she (my grandmother and my aunts were allowed to help if they were foolish enough to be around) was doing.3

After I'd fetched a jar from the basement, my mother always prepared her green beans the same way. She dumped the whole jar into a saucepan, added some salt pork, and boiled until the rest of dinner was ready, which was often quite a while later. They were always delicious, and who doesn't like salt pork? (Rhetorical question.)

I was in my twenties when I first read Julia Child's description of the French method for preparing haricots verts. It entirely changed the way that I looked at vegetables, and for years afterwards whenever I prepared green beans, I bought them young and tender, cut off only the stem end, left them whole, boiled them for a few minutes, shocked them in ice water, and sauteed them with butter, salt, and pepper. I still love green beans prepared in that way, which also works very well with the thin green beans that one can buy frozen at Trader Joe's. As time went by, my mother put by fewer and fewer beans and then moved out of my childhood home and gave up growing and canning beans altogether, so I was less and less exposed to the treatment that she learned from her mother.

Even if you pay attention to food trends only as little as I do (which, really, is hardly at all), you will likely have noticed that over the last few years, there has been a reemerging interest in longer cooking methods for green beans. I had, until very recently, dismissed this as a sort of retro-trendiness that was not worth my time. Surely, I reasoned, longer cooking could do nothing but rob the vegetables of flavor and nutrients.

But I've been eating a lot of green beans recently, and I felt the need to come up with a different way to serve them. This dish has become one of my staple foods, partly because it fits the parameters of my diet, partly because it's very versatile, but mostly just because it's yummy.


Longsuffering Green Beans


1 T. olive oil
One medium-small onion, diced
1 clove garlic, finely chopped
1 14-ounce can diced tomatoes
12 kalamata olives, quartered
2 T. capers, well drained
1 t. dried oregano
1 t. dried basil
A 1.5 lb bag of Trader Joe's frozen thin green beans, defrosted
1/3 c. pearled barley
Salt and pepper, to taste

In a large, heavy saucepan, heat the olive oil over medium-low heat. Add the diced onion, cover, and cook for about five minutes, until the onion is well softened. Add the garlic, stir, and cook for about a minute. Do not brown the garlic. Add the tomatoes (with their juice), olives, capers, oregano, and basil. Stir well, cover, and cook for about five minutes. Add the defrosted beans and stir well. Cover and cook for ten to twenty minutes, stirring occasionally. Add the barley, stir, cover, and cook for another thirty to forty minutes, stirring two or three times, until the barley is tender. Season with salt and pepper.


You may have to adjust this dish to your own taste. V., for example, finds it a bit acidic, though I think that may be because I didn't drain the capers before he tried it. I find, though, that I like the acidity. If you don't, you can easily add more oil. You may also want more or less basil, oregano, or capers. I can't imagine wanting fewer olives, but that's entirely up to you. I only stop at a dozen because I feel like I'm abusing the fact that olives are on my core food list.

The timing here is also highly approximate, and the dish is very forgiving. You can get away with cooking it a lot less. Or you can cook it for longer. It reheats beautifully in the microwave, so it makes a great addition to lunch. The barley is a very recent addition for me. Without it the beans are somewhat soupy. I enjoy the soupiness when I am using these beans as a base for a one-dish meal: when the beans are nearly done, I add a grilled chicken breast or a raw fish fillet and let it poach until the protein is done just the way I like it. That would be especially good if you're able to mop up the juices with some nice crusty bread. I haven't added shrimp or scallops yet, but I've got them on the list.

1I'm not trying to say here that I had anything but a happy childhood or loving parents. My mother may have been a little weird about dinner, but it's not like she would melt down at the sight of wire hangers. Speaking of which, I've never really understood why Joan Crawford just didn't get rid of all the wire hangers in her home. But I digress. Duh.

2Yet another opportunity to overstate the notional wretchedness of my youth escapes me here. While part of our basement was technically unfinished, it was nothing like a root cellar or anything remotely resembling any part of The Silence of the Lambs. The green beans, in fact, were stored with the tomatoes on open shelves a few feet away from the washer and the dryer. We weren't even miserable enough to have vermin, unless you count that one time that a small family of snakes managed to find their way into the rec room and terrorize my mother, even though the presumed Mama snake was only about five inches long and the four baby snakes were no more than two inches each. God only knows how the snakes got into the rec room, but they looked pretty cool winding in formation across the linoleum. My father gathered them into a dust pan and put them outside, and they were never heard from again. I suppose there was also the mouse incident, but since the mouse in question was an albino lab mouse that I brought home after a science experiment was finished, I think counting it is a bit of a stretch.

3One year, when my mother was feeling too ornery (this word is pronounced "ON-ree" where my mother's family comes from) to process one of the batches, my father did it instead, and when the jars had been put on the shelf in the basement, Mom discovered a little yellow worm in one of the jars. She showed it to everyone she could find. She still talks about it.

Labels:

Monday, November 20, 2006

Production Pies


I've always said that I like to cook almost as much as I like to eat, but it wasn't until I started this most recent round of dieting that I learned that a) I actually like to cook more than I like to eat. I've also learned that except for the small matter of being kept alive through nourishment, cooking gratifies me in all the ways that eating does, plus a couple. Fortunately, we're entering the season where it's entirely acceptable to give people a whole lot of food that you've made yourself. For me, this season kicked off a couple of weeks ago when the church had its annual bazaar, for which I made about a dozen-and-a-half caramel apples and three pies. Pies are really the perfect baked good for the church bazaar: relatively few people make them, and they fetch a pretty decent price for the amount of work involved, provided that you make several of them at a time.

I've been thinking a lot about pie dough, recently, where "recently" means for the past twenty-five years or so. I have come to the conclusion that a lifelong contemplation and pursuit of the perfect pie dough is about as good a religious practice as there is: the perfect pie crust and God are similarly complex and elusive notions, but the pursuit of one will get you a lot of good food while the pursuit of the other has a tendency to lead to excessive self-righteousness. Wistful as I am for the days when faith was possible and even easy, I am not one to belittle anyone's religion, but go knock on twenty doors and offer a piece of good pie and then knock on another twenty doors and offer advice from the religious text of your choice and let me know where you're more welcome. Report back your results: I'll keep track.

There are, of course, many people who are convinced at an early age that they've found God and/or the perfect pie crust recipe, and I am not interested in disabusing them of either notion. But I've been searching for a long time, and while my pie dough is almost always flaky and tasty, I am never fully satisfied with it. Part of my dissatisfaction comes from my innate inability to leave well enough alone, but I think that a larger part of it comes from the unavoidable fact that pie dough involves fundamental trade-offs. For example, pie dough made with shortening is easier to handle and holds its shape better than pie dough made with butter. Pie dough made with butter tastes better, but it also burns more easily. Pie dough made with lard is said to be the flakiest of all, but: lard. Ew.

And then there's the matter of how much butter (or whatever) you're going to use. More is tastier, but more is also harder to handle.

In the past, my compromise has been to combine butter and shortening by melting the two together and then refrigerating them until solid. It's a good compromise, but it's still a compromise. Most recently, I decided to try using both butter and shortening but in different ways. I reasoned that if I mixed the shortening in very thoroughly but left the butter in larger lumps, I might get the tensile strength of a shortening dough and the flavor of a butter dough. What I got did taste very good, but I still don't think that it's a strong enough dough to, say, hold a crimped shape when baked blind.

Alas. Perhaps I shall, some day, achieve enlightenment, but I'm not holding my breath. In any case, when you're making a bunch of pies and you need to pre-bake the crusts, you're better off going with stacked crusts than with separate crimped crusts. That's what I did for the bazaar. I used a simple fork-press decoration, I left a slight overhang (to compensate for shrinkage while in the oven) on the disposable pie plates, and I stacked the crusts three high for baking. The best way to do this is to stack the three crusts upside down on top of an empty pie plate (that's four pie plates in total). Then you place the whole stack upside down on one (right-side up) sheet pan and put a second sheet pan (also upside down) on top of the bottom of the pie plate holding the last crust. The weight prevents rising and bubbling during the initial baking (about 15 minutes at 350), and then when that baking's done, you can take the whole pile out of the oven, and flip it over to cool slightly. Then you just peel the pie plates apart. If the dough overhangs the edges, you can even them up with some kitchen shears. At this point, you have a good, partially baked pie crust, which you can either fill and then bake or bake and then fill, depending on what pie you're making.

Large Batch Pie Dough

8 ounces cake flour
24 ounces all purpose flour
1 t. kosher salt
1/4 c. granulated sugar
1/2 cup vegetable shortening
1 pound butter
2 eggs
ice water

Put the dry ingredients into the bowl of your stand mixer. Mix for thirty seconds or so with the paddle attachment. Add the shortening in several pieces, turn the mixer on, and mix until the shortening is very entirely mixed into the dough. Move the mixture to the freezer.

Cut each stick of butter into 32 pieces (2x2x8). Put the butter pieces in the freezer for about half an hour.

Take the flour mixture and the butter out of the freezer. Put the butter in the flour and toss so that the pieces of butter are separate. With a pastry blender, cut the butter in very briefly so that there are still substantial pieces of butter left.

Crack the eggs into a bowl and whisk together with one cup of ice water. Add to the flour and butter mixture and toss with a large fork. If the mixture is too dry to gather into a ball, add additional water, one tablespoon at a time and toss again until the mixture can be gathered.

Divide the dough into six pieces (each should be about ten ounces), wrap in plastic, and refrigerate for at least two hours or until ready to use.


For the bazaar, I decided to go with a variation on my mom's chocolate pie. I made a slight error in calculation when I made the three pies for the bazaar, so that they had less peanut butter in them than I'd wanted, but I'm sure they were still delicious. I made another one this past weekend when a friend was coming to dinner, and I took a very, very small piece for myself just to verify that it was yummy. All four people who've tasted the pie agree: very good, very rich.

Cocoa Peanut Butter Pie

1 partially baked, 8- or 9-inch pie crust
1/3 c. unsweetened cocoa powder
2/3 c. granulated sugar*
2 T. flour
1/2 c. milk
2 eggs, separated
2 T. butter
1/4 c. peanut butter


Whisk together the cocoa powder, sugar, and flour until there are no lumps. In a separate bowl, whisk together the milk and the yolks of the eggs. Add these to the dry ingredients and mix thoroughly.

Melt the butter and peanut butter together and let cool to lukewarm. Add to the other ingredients and mix well.

Beat the egg whites until you have stiff peaks. Fold them into the other ingredients, and turn into the pie shell. Bake for 30-45 minutes, until done.


The baking time for the pie will vary depending on the size pan you've used and how often you open the oven to fret over whether it's done yet. If you use an 8" pan and start checking after half an hour, it'll likely take forty-five minutes. If you use a 9.5" pan, and go do something else, it may very well be done in thirty minutes. I think that the best option is to use a 9" pan and look through the door. With any luck, it'll be done perfectly in thirty-five to forty minutes.

Monday, November 13, 2006

Turkey IV: Scotch Eggs


I have never been to Scotland, but I kinda like the music though I certainly intend to go some day. Still, I'm pretty sure that even those who don't know the difference between tartan and plaid (there is a difference, isn't there?) will know that my version of Scotch eggs is entirely inauthentic. I'm not sure that's such a bad thing: my research suggests that over in the British isles, the Scotch egg is seen as a bit déclassé. Still, this recipe, while very tasty, is nothing like what I think of as the ideal of the Scotch Egg. If I were under no dietary or logistical constraints, I believe that I would start out by either deep frying a whole egg for thirty seconds or by taking a blowtorch to it for a similar period of time so that the outside of the egg would be cooked while the inside was still liquid. Then I'd carefully remove the shell, coat the egg with pork sausage, roll it in beaten eggs, roll it again in bread crumbs, then deep fry it just long enough for the sausage and egg white to be cooked through while the egg yolk would get hot but would remain runny.

But I think that this may be one of those times when it's better to imagine eating such a decadent thing than to actually eat it. Even when I'm not dieting, there are times when I can only handle so much fat at one time. Unless it's butter, of course, and then all bets are off. Mmmmm, butter.

In any case, I'm very fond of sausage, and when I first decided to try making some with about eight ounces of ground lean (93/7) turkey that I had leftover from making some quenelles, I didn't think that the result would be anything more than edible. I was, however, pleasantly surprised. I surmise that the freshness of the meat makes up for the reduction in fat, though it's also possible that my palate is simply adjusting to how much less fat it's being exposed to. Nonetheless, I think that most people would find the self-made turkey sausage to be predominantly yummy rather than austere.

In addition to being lower in fat and calories, self-made turkey sausage is significantly cheaper than the pork sausage that comes in plastic tubes at the supermarket. Making it yourself also allows you to adjust the seasonings to your own taste and to try many different variations, particularly if, like me, you buy your ground turkey at Costco, where it comes in four-packs of about 1.5 lbs. each. Instead of the following recipe, you might try just adding salt, pepper, and sage to your ground turkey.

Turkey Sausage

1.5 lbs. ground lean turkey
1.5 t. salt
1/4 t. garlic powder
1 t. ground smoked sweet paprika
ground black pepper to taste

But all ingredients in a bowl. Mix.


I mix the ingredients with my hands, but if you prefer, you can use your stand mixer or a sturdy spoon. Fry up a teaspoon or so of the sausage, taste it, and add more of anything that you think would be a good idea.

Online recipes tell me that it's traditional to make a Scotch egg with as little as two ounces of sausage per egg. I'm not sure that I would have been able to fully coat my eggs with two ounces. I probably could have done it with four ounces, but I ended up using closer to six ounces per egg. I think that four ounces of lean sausage and a boiled egg together make a generous breakfast, and that's probably what I'll shoot for next time. The Scotch eggs are very good by themselves, but they would probably be better with a nice Dijon mustard. Or some Hollandaise, I suppose, but I really should not let my mind go right there right now.

Scotch Eggs

6 boiled eggs*
1.5 pounds turkey sausage

Preheat oven to 350 degrees

Peel the eggs. Cover each egg with four ounces of sausage, doing your best to make the finished product ovoid. Place the coated eggs in a lightly oiled pan, and bake for about twenty-five minutes. Finish the eggs under the broiler to get them nice and brown.


*FYI, I slightly modified the rather complicated process that I have heretofore used for boiling eggs. This time, I put my eggs in a pan, filled it with cold water, brought the water to a boil, turned the fire off, put the lid on, and let them sit for fifteen minutes. Then I drained out the hot water, replaced it with cold water, added about ten ice cubes, and let the whole thing sit until fully cool. Then I removed the eggs, brought the water back to a boil, put them back in for one minute, and took them out. At that point, the peels came off very easily.

As always, when you're going to make hard-boiled eggs, try not to use the freshest of eggs. If they've been sitting in the refrigerator for a few days, your task will be much easier.

Saturday, November 11, 2006

Turkey III: A Bit of the Briny


Kitchen failures are always painful, but there is almost always a silver lining. Best, of course, is when you're a reliably good cook and you fail spectacularly in front of a group of friends. Excruciating, yes, but everyone can laugh about it for years. I'm sure that if I were to call my friend R. right now and mention chili, he would remember, as though it were yesterday, that egregious pot of chili I made twenty-two years, three months, and sixteen days ago. Not that I'm counting.

Less entertaining but more instructive is the partial failure: when the food you've produced is seriously flawed but has redeeming qualities and when the problem is clear and easily avoidable the next time you want to make the dish.

Yesterday evening I suffered a partial failure, and I am now appropriately edified. I wrote earlier about the turkey breast I bought last week. The first half of it went into a nice bowl of chili; the carcass went into a (eventually) nice pot of soup. That left me with the other half of the breast that I'd removed from the bone. I wanted to roast it, but I wanted to be sure that it ended up juicy and flavorful, so I decided to brine it.

Brining poultry, especially turkey, is extremely popular these days, but as recently as ten years ago, one rarely if ever saw a brined turkey. I mention this fact mainly by way of explaining that most of my information about brining poultry comes not from my fairly extensive collection of cookbooks but from the television and, by extension, the Internet. Alas, my Internet connection was down five or six days ago when I wanted to make the brine, so I had to try to find the proportions in a cookbook. So off I trotted to Joy of Cooking, which did, in fact, mention brining. Sadly, it was not listed as a means of preparing poultry for cooking, but as a means for preserving food: the first step, I believe, in making some sorts of pickles.

As it happens, the brine for pickling is about twice as salty as the brine one should use for turkey, so that when I'd finished searing and roasting and resting and slicing my turkey breast last night, I bit into a piece that was done just exactly right, was very juicy, had many wonderful flavors, and was almost too salty to be edible. Almost, but not quite: the other flavors convinced me to put up with more salt than I'd normally stand for.

At first I thought that I had perhaps simply brined the turkey breast for too long: I had originally intended to brine it for about a day, and I ended up leaving it in for about five days. But that explanation seemed chemically wrong to me. I am not a chemist, and it's been years since I really had to know any chemistry, but it seemed to me that the turkey breast would have gotten about as salty as it would get within a day or two and that an extra few days would probably not change the flavor much.

I did eventually find the recipe for brine from which I'd departed to make last year's Thanksgiving turkey, and it indicated to me that I'd used twice as much salt as I ought. Alas. The recipe below includes the amount of salt that you should use if you want your turkey breast to be delicious but not too salty.

Brined Turkey Breast

A half turkey breast, without skin or bone

1 quart water
2 T. kosher salt
1 clove garlic, cut in half
3 green cardomom pods, lightly crushed
10 peppercorns
20 very thin slices of fresh ginger

1 T. balsamic vinegar
Coarsely ground pepper

Olive oil

Put the turkey breast in a large zip-lock food bag.

Heat the water, add the salt and stir until dissolved. Add the garlic, peppercorns, cardamom pods, and fresh ginger. Stir. Let cool. Pour the brine into the bag with the turkey breast. Seal and refrigerate for at least a day.

Preheat oven to 375 degrees.

Put a nonstick skillet over medium-high heat.

Drain the turkey breast and pat it dry. Put it in a bowl and pour the balsamic vinegar over it. Rub it well all over with the vinegar. Generously grind the pepper over all sides of the turkey breast and rub in.

Either spray the skillet with a small amount of olive oil or just pour a little in the pan. Add the turkey breast and cook without moving for about five minutes. Turn over and cook the other side.

Transfer the turkey breast to a baking dish. Stick your thermometer into the thickest part of the breast. Set your thermometer alarm to go off at 158 degrees.

Roast for fifteen minutes at 375. Turn heat down to 325.

When the alarm goes off, remove the turkey from the oven and let sit for at least fifteen minutes before slicing.


I don't think that slicing the ginger very thin is imperative here. I recently dumped my old V-slicer for one of the more compact Japanese slicer models with a ceramic blade. I used that to slice my ginger (which I keep in the freezer), but you could cut your ginger into relatively fine dice with a knife. You don't have to use ginger, of course, but the very best thing about the turkey breast I made was how well the ginger flavor had permeated the flesh, and how well it went with the considerable amount of pepper that I'd applied to the outside.

I think that a good meat thermometer is really the only way to go if you want to roast any sort of meat. Ever since V. started using my thermometer, his pork has always been perfectly roasted. If you set the alarm at 158 here, the internal temperature will go at least to 160 after you remove the meat from the oven. At that temperature, brined turkey breast will have a decided pink cast to it, but it will, in fact, be entirely done, though still tender and juicy.

If you don't use a thermometer, you're really just guessing, and if your turkey or turkey breast comes with one of those pop-up thermometer, just take it out of the raw turkey and throw it away: they go off at temperatures that are too high to be consistent with moist meat.

Thursday, November 09, 2006

Turkey II: Beau--ootiful Soo--oop

The final version looked much nicer, really.
If you've got a whole turkey breast and you've taken the beautiful breast meat off the bone to give you two boneless turkey breasts (or perhaps two boneless turkey half-breasts, exactly what constitutes a breast being a matter of some ambiguity), then you've still got a lot of good stuff left to work with. I'll admit right up front that I haven't bothered to do anything with all that skin. Surely the most frugal of cooks will want to render the fat for another use or perhaps make cracklings from the skin, but I just go ahead and throw it away. The horror.

Even after discarding the skin, however, I'm left with a large bone and a small but significant amount of flesh. I suppose that if you're a performance artist, your options for using the carcass are virtually unlimited, but if you're a cook, you will want to make turkey stock. Once you've got your turkey stock, you can do anything that you like with it, though I would, once again, counsel against the performance art options and recommend that you use it more or less the same way you'd use chicken stock. I almost always just go ahead and make soup.

Making poultry stock is a process that does not really lend itself to precise recipes, but I will tell you that in addition to the turkey carcass, which still had perhaps six or eight ounces of meat clinging to it in various places, I used three whole celery stalks, a handful of small carrots, an onion, about ten peppercorns, two small bay leaves, four cloves, and two or three green cardomom pods. In order to get a little more color, I partially caramelized the onion first. One does this by cutting the onion in half and putting it, cut-side down, in a nonstick skillet that has had a quick spray of either cooking spray or oil applied to it. Let the onion cook over medium heat until the cut sides are nicely browned but not black. You have, in essence, created caramel coloring here, but you have also added some good flavor to the onion.

Put your turkey carcass in a big pot with four quarts (or so) of water and your aromatics and spices. There is nothing special about the ingredients I've chosen. If you happen to have some nice leeks lying about, you can use those in addition to or instead of the onions, but I rarely have nice leeks lying about unless I've paid a considerable amount for them. You can use more or fewer spices, and you can vary the amounts. You can certainly use larger carrots, especially given that the small carrots are just large carrots that have been machined down for marketing purposes.

I bring my water et al just to a boil, reduce the heat to a simmer, cover, and let cook for at least an hour before I add any salt, and then I add only a teaspoon, but as long as you don't forget that your stock is likely to be somewhat concentrated before it's finished, you can add your salt right away and in as large a quantity as you like. Skim as necessary, though I find that a turkey breast carcass requires a good deal less skimming than does, say, a whole chicken.

It does not do to hurry the stock-making process. If you lack time, put your (turkey's) carcass in a bag and freeze it until you're ready to work for it. You really don't have to pay much attention to your stock while it's cooking, but you need to let it cook slowly for a long time so that you can extract the maximum amount of flavor and gelatine from the carcass.

Because it's been pretty cold here, when my stock had been simmering for three or four (ok, six) hours, I pulled out the bones and other solids as well as I could, wiped the detritus from the sides of the stockpot, covered the pot, and set it outside to cool down. I eventually transferred the pot to the refrigerator, and the next day I skimmed off the layer of fat that had formed on the top. The stock was very lightly jelled, which is just what I wanted.

If you're making chicken soup from a whole chicken (and that's something I do frequently), you really only need to cook the chicken for maybe ninety minutes, and then you can let it cool and take the meat off the bones and put it back into the soup, and yum. If you're making turkey stock from the carcass, when you've pulled out the bones and the vegetables and what all, you'll find a significant amount of meat still on the bone, and if you pull it off, you might have a cup or more of very thoroughly boiled turkey meat. You will be tempted to find another use for this meat, but I beg you to resist the temptation.

I didn't. I figured that I could grind the meat, season it heavily, and make some nice quenelles to go in my soup. In this case, seasoning heavily involved dijon mustard, kalamata olives, salt, pepper, and other spices, the exact makeup of which, fortunately, have been lost in the distant past of last weekend. The mixture appeared to grind up nicely, and after I bound it with egg white, it certainly formed quenelles easily, and the quenelles even cooked moderately well in the simmering soup. Alas, they were a big disappointment on the palate. The flavor was acceptable, but the texture was odd in a puffy sort of way. We're not talking repulsive here (at least in terms of edibility: the picture at the head of this post is the soup with the failed quenelles, and they look sort of like fossilized turkey droppings, whereas the improved quenelles look like they belong in soup, rather than on the compost heap), just odd enough that the next day, I fished all the quenelles out, disposed of them humanely, and started over with some ground turkey.

I think the point here is that if you want every bit of the meat to end up in your soup, you should remove it from the bone before you make the stock, reserve it, and make your quenelles from the uncooked turkey breast. The ground turkey I used for the second round was not the 99% fat free ground turkey breast, but the 93/7 lean ground turkey. The second round of quenelles was very nice. They had a light, clean flavor. The texture was certainly denser than one expects in, say, a fish quenelle, but they were solid without being heavy and firm without being rubbery. Also, they held together very well, without throwing off any of the little bits that the first quenelles had thrown off and that made me spend many minutes with my fine skimmer trying to get out fine bits of failed quenelle so that I could bring the soup back to a boil and cook the second round. Let that be a lesson to you.

When your turkey stock is done, but before you make the quenelles (if you're making them: you can certainly make soup without them, with, say, the addition of noodles and cilantro and lime juice), check the stock for salt. If you've only added a teaspoon, you'll need substantially more. You'll probably also want some pepper, and if you feel like it, you can add some fresh dill or cilantro or whatever you have about that you think would taste good. I also added about a cup-and-a-half each of sliced celery and carrots, which I simmered until the carrots were tender but not mushy. Then I added the quenelles and simmered for another five minutes or so until they were done. Yum. And equally yum the next day and the day after that.

Forming quenelles with two teaspoons is one of those kitchen tasks that is highly satisfying. It is a difficult motion to describe, but if you happen to run into me on the street, and you happen to have with you a bowl of quenelle paste, two spoons, and a pot of simmering soup (and, really, who doesn't?), I'll be delighted to demonstrate.

Turkey Quenelles

8 ounces lean turkey
1/2 t. kosher salt
ground pepper
1 t. dijon mustard
1/4 t. paprika
1 egg
A pot of turkey soup that is finished except that it is crying out for quenelles

Combine all ingredients except the egg in the food processor and process to a fine paste. Add the egg and process until well incorporated. Scrape the paste into a bowl. Use two teaspoons to form the paste into quenelles and drop them into simmering soup. They should rise to the top of the soup almost immediately. Simmer for about five minutes.


If you decide to use breast meat that you've scraped off the bone prior to cooking, keep in mind that this meat will be very lean indeed. You may want to add an extra egg yolk or a little bit of oil to the quenelle paste. As I mentioned, I used the 93% lean turkey, and it tasted just right to me.

You can also add all manner of other edible matter to your quenelles. I briefly considered some finely chopped green olives with pimientos or a small amount of minced cornichon, but I decided to keep it simple because it was my first (ok, second) try, and because I thought a limited number of additional flavors would work well with the ingredients I had in the soup. But, as always, feel free to adjust the quenelles according to your tastes and the soup you're making.

Monday, November 06, 2006

Turkey I: A Bowl of White


We here at anapestic are all about tradition (except, of course, for when we're not), so we are perhaps in error to suggest that at least one major Thanksgiving tradition needs to die a quick -- though not necessarily painless -- death. We have, however, had just about enough of the annual whinging about leftover turkey*. You all know how this goes. You can pretty much picture the overwrought homemaker: she is wearing a sweater set and a strand of pearls, which she is clutching, and she is wondering, "Whatever shall I do with all this turkey?" Her husband, you see, is tired of turkey sandwiches, and the children simply will not eat her turkey croquettes, and if she has to choke down one more bowl of turkey soup, she will simply perish from the accompanying ennui. The turkey, we are given to understand, is almost single handedly responsible for the cultural extinction of Donna Reed.

I have, at various times, seen perhaps a dozen episodes of The Donna Reed Show, and to be honest, I am unable to work up much sympathy for Ms. Reed's passing. (You are to understand, as no doubt you already do, that I am speaking antonomasially here. It is the Donna Reed archetype that I am unable to mourn. Ms. Reed herself, who died in 1986, was doubtless a wonderful person and is equally doubtless much missed by her friends, family, and fans.)

While I have no desire to see the return of the stereotypical homemaker to either our televisions or our lives, I nonetheless have the answers to her turkey dilemma. Yes, yes, I know: you think that such answers can be obtained only by trekking through the lower Himalayas and humbling oneself before a cave-dwelling hermit, or, perhaps, through the state of enlightenment that is achieved only after twenty straight hours of vacuuming. But I have saved you, and Donna Reed, the effort:

1. Learn to cook the turkey properly so that your family will happily eat it in all of its various manifestations, or

2. Buy a smaller turkey.


Anyway, now that I'm back from showering off the sarcasm that I was dripping with, let me say that I adore turkey, and the idea of complaining about leftover turkey is so foreign to me that I view it more with curiosity than with disdain, though it is clearly deserving of both. November may be the month for others to write a novel, but for me it's the month to celebrate turkey. I will certainly have a substantial bird on the Thanksgiving table, but I started this weekend with a substantial turkey breast.

A nice five- or six-pound turkey breast will provide three substantial meals for four to six people. These days you can buy prepared turkey cutlets, but they are very expensive. You can find the turkey breast, especially at this time of year, for around ten dollars, and if you are willing to deal with raw poultry yourself, you'll save a lot of money by removing the breast meat from the bone yourself. You'll also ensure the third meal by having a meaty bone left over to make the stock for your soup.

(Right here is where I was going to transcribe the conversation that V. and I had when he came into the kitchen while I was boning the turkey breast and asked him to grab a plate for me to put the first half of the breast on so that I'd have room to remove the second half of the breast and he asked me why I was going to all of this trouble to get a boneless breast and I told him that they didn't come already prepared and he looked very confused and I explained to him that this was a turkey breast, not a chicken breast, and I asked him whether the size wasn't something of a giveaway, and he muttered something about chicken farmers using steroids before retiring from the kitchen in shame, but that would just be mean, even though it really happened.)

The perfect bowl of turkey chili is something that I've been after for a long time. I haven't quite found it yet, but I got very close with this recipe that I adapted from one over at epicurious.com and that apparently was originally from Bon Appetit. The original recipe calls for some ground turkey as well as the cubed turkey, and that would probably give some additional flavor, since ground turkey tends to have a higher amount of dark meat and fat. I'm trying to avoid fat, and I really don't think it's missed here. What is missed is some hint of smokiness and perhaps a bit of heat. I think that the next time I make this, I'll add a smoked chili of some sort, and I think that I'll be more careful not to remove the ribs from the jalapenos when I'm removing the seeds. Nonetheless, this is a very good bowl of chili, particularly on the second day and with the liberal addition of some hot sauce.

The original recipe also does not have celery, lime, or cilantro. The celery I added mainly to get a little more vegetable content: it is fully optional. The cilantro and lime are, I think, valuable additions.

White Bean Turkey Chili

1 c. dried small white beans
1 c. dried chick peas
2 T. olive oil
1/2 c. chopped onions
2 T. minced garlic
2 T. cumin
1/2 c. minced celery
1/2 turkey breast, cut into half-inch dice
2 T. minced jalapenos, without their seeds
1 t. dried marjoram
1 t. dried savory
1 quart chicken broth
1/2 c. pearled barley
2 T. chopped fresh cilantro
The juice of one lime

Put the dried beans and chick peas in a bowl that can handle boiling water and that holds at least 8 cups. Pour six cups of boiling water over them and let sit for two hours. Drain and rinse well.

In a heavy pan, heat the olive oil over medium heat. Add the onions and garlic, stir, cover, and let cook for five minutes or so, until the onions and garlic are soft but not brown. Add the cumin and stir well until fragrant. Add the celery and turkey breast and cook, stirring constantly, until the turkey is cooked on all sides.

Add the jalapenos, marjoram, and savory, and stir well. Add the chicken broth and the rinsed beans and chick peas, stir, and bring to a boil. Reduce to a simmer, and let simmer, covered, for about two hours. Add the barley, and continue simmering for another hour, until the barley and beans are all tender. Add water if the chili becomes too thick. Add the cilantro and lime juice and taste carefully for seasoning. Serve with hot sauce and lime wedges.


The original recipe calls for canned beans, and there's no reason why you can't make it that way. Just substitute a can of chick peas and a can of another bean of your choice. Put the barley in when you add the chicken broth and other ingredients, and the beans (well drained, please) about fifteen minutes before the barley is tender. I like for my chili to cook a long time, and, in fact, it simmered for about an extra hour after the barley was tender because about half an hour before the barley was done, I asked V. if he wanted to go with me to Tower Records to check out their going out of business sale. The classical section was pretty well picked over, so I didn't get the Bach cantata that I wanted, but I did score a copy of a Dolly Parton bluegrass album at a very good price. And when I got home, the chili was so thick that it would soon have started scorching. But I added some water, and everything was just fine, though I think it's clear that Donna Reed wouldn't have approved.


*The annual whinging about the leftover turkey, of course, is the warm-up act for the annual whinging about fruitcake. I'll spare you yet another rant about that topic, but only for now.